Saturday, March 6, 2010

Sour Dough Starter: Day 3

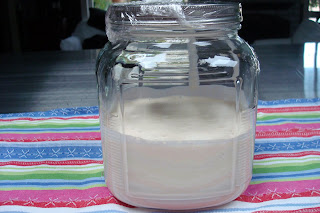
Today is the final day of babysitting the starter. When I opened the cupboard today, I knew that it was ready because the smell of sourdough hit my nose. Trust me, it isn't a bad smell. Sourdough sounds like it would have a really bad smell, but it's not. With time and the right care, the sourdough will develop even more and have an even more full bodied flavor.

When I lifted up the towel, I wasn't disappointed. It was very foamy. 

My first look through the plastic wrap

 You can see the bubbles and foam

 
 This is super close so that you can see the foam

 
 I stirred it up really well and poured it in an air-tight jar  

Now I wait until a clear liquid has risen to the top. When this happens, it is ready to use.

From here it goes into the refrigerator. It can be stored indefinitely if you "feed" it every week. Just add 1 teaspoon of granulated sugar and stir very well.

I will be making the Black Bread soon, and I will also post several more sourdough recipes.


Friday, March 5, 2010

Sourdough Starter: Day 2

Well, It has been 8 hours and the starter is ready to go to the next step.
I started it at 8pm last night so this is working extra fast.

This is what it looked like this morning at 8am, 12 hours later.

 
Here is a shot of the bubbles

  
You can see how high it rose in the night

I stirred it up. It is very thick and sticky.

I covered the bowl with plastic wrap, covered it with a towel and placed it back in my draft-free cupboard.


This morning you can smell a very strong yeasty smell. This lets me know that it is definitely working. I will check it again in 24 hours to see if it is foamy.

Thursday, March 4, 2010

How to make a Sourdough Starter

Before I found this recipe, trying to make a sourdough starter seem really hard and had so many steps that I just never had the courage to even try. When I found this recipe printed in the Oregonian's Food Day several years ago, I knew I had to try it, especially because it sounded so easy. This recipe has worked perfectly, every time I have made it. If you have been afraid of sourdough, you should really try this recipe. You won't be sorry. It couldn't be easier to put together. All you do is mix a packet of yeast, warm water and flour together in a specific order. After that, it takes over and does it's own thing, and all you have to do is check in on it and give it a couple of stirs. In less than a week, you will have your own sourdough starter.

I decided that I would document this process with instructions and pictures so that you will  know what it should look like and when it is ready for use.

First, we will start with the recipe.

Sourdough Starter

This recipe comes from the Otis Cafe in Otis, Oregon ...

See Sourdough Starter on Key Ingredient.


Yeast dissolved in warm water 


 Flour stirred into warm water and yeast


Mixture covered with cloth

It took 15 minutes for this whole process, including taking the pictures. I don't have a place to store mine where the temperature is 80 to 85 degrees, like the recipe states, but it has never been a problem, as long as it is in a draft-free area. It is possible that it will take a little longer than 24 hours. I can't help myself, I always peek under the cloth a couple of times a day to see how it's doing in there.
 
My next sourdough post will happen as soon I see the bubbles start forming.

Wednesday, March 3, 2010

Bones for the Doggies

Today I decided to make some treats for the dogs. I like their treats to be small so that they can have a couple of them a day, rather than one larger bone. These are small enough that they won't fill up on a bone and then skip a meal. Small dogs, small treats.

I found several great recipes at Bullwinkle.com and decided to try the easiest one first. Here is the recipe.

Peanut Butter Puppy Poppers

Homemade Dog Treats

See Peanut Butter Puppy Poppers on Key Ingredient.


They mixed up very fast in the KitchenAid. I let the paddle do the kneading. I used a small cookie cutter to cut them out and baked them in two batches. They actually smelled good while they were baking, but of course the question is, will the dogs like them? 

 
Buddy and Lucy  begging on their back legs

 
Lucy gobbled hers down and headed for Buddy's treat

 
 It takes Buddy a while because he likes to roll on his treats for a while

 
Lucy came back for another half 

 Buddy back for his second half

 
Lucy is back for more,

 
And so is Buddy. I'd say they love them! They can't stop salivating!
Lucky me, now I'm the boss of this house. I now have all the power. Stubborn Lucy will come running in when I call her in, rather than having a stand off on the other side of the pool, refusing to come in. They are following me around like magnets, absolutely glued to me. It's nice to be the boss again, at least until I run out of treats.

Tuesday, March 2, 2010

Changing the Sheets

A couple weeks ago I heard about a survey taken asking people how often they changed their sheets. I was shocked to hear that some people change their bed sheets only 6 times a year. The majority changed their sheets weekly. In real close second was twice a month. In very close third came monthly. Wow, I knew I had a thing about clean sheets, but I didn't realize how many people don't care that much. It would be interesting to know how a person ends up changing their sheets 6 times a year. Is it an "I don't have time" thing, or laziness, or for water conservation reasons, or I just don't think about it, or I just don't care about it. It would be very interesting to know why.

At our house, we change the sheets every 4 days. I know that probably sounds like way too often to someone who changes them every other month. If I had daily "help", I would have them changed every other day, you know, like they do when you are staying in a Hotel. I just sleep better on the nights that we have clean sheets. I know it does use a bit of water, but we do have energy saving appliances, and we both drive Hybrid's if that counts at all.

Choosing the type of sheets you prefer can be a very time consuming project. When you find a pair of sheets that you absolutely love, the easiest way to make sure you have a spare when they are threadbare is to buy 2 sets. If that isn't realistic, write down the the brand name, thread count while you can still read the tag, and put it in a safe place. That will help you with your next purchase. That is what I try to do.

The problem with buying sheets is you can't find much information on how to buy the perfect set for you that suits your preference. We all see what has happened to "real" customer service, where people actually care and are knowledgeable about what they are selling. We have learned a few things through a few bad and good sheet experiences. In the winter, we like a sheet that doesn't leave you foot feeling cold when you move your leg over the sheets. This is usually the case with sheets that have a very high thread count. We keep those sheets on all winter. During the summer months, we want a sheet that has a lower thread count because it breaths and does feel cool when you move your leg to a new spot. We realized this after sleeping most of a summer on high thread count sheets and we were always too hot. 

To sleep cooler in the summer, we now look for a lower thread count with a sateen finish. Always try to wiggle a finger inside the zipper so that you can feel the sheets before you buy them. They do have a stiffener on them, but you can tell a lot just by feeling them. A sateen sheet set will usually have a very cool feeling on your fingers. If you can manage to get enough sheet out to blow on, feel how much air comes through to your hand. If you can barely feel any air, those sheets won't breathe in the summer, but they will be great in the winter. If you feel the air, you will sleep much cooler.

Which leads me to this. It is usually quite an investment to buy a set of California King sheets, and I am always looking for a great buy on sheets. I was so excited last week when I found these.
 

I found them at Costco and they were under $38.00! That was $20 dollars less than their Kirkland brand. And these are Tommy Bahama Home. We have an "Island"  themed room, so these will look just fine with the other bed linens. If you are looking for a new sheet set, you should head to Costco and check them out. I have a feeling they could sell out fast, especially if I buy more.


Monday, March 1, 2010

National Peanut Butter Lover's Day


I must have missed the memo that we now have a National Peanut Butter Day. I love peanut butter any day! I'm wondering if there is a National Chocolate Day. Hmm.. maybe that comes next. We can hope. How about a National Chocolate/Peanut Butter day? That would be even better! In honor of peanut butter, I am posting a couple of my favorite peanut butter recipes.


This is a really good cookie.  It is chewy and moist. The best part is that it is super quick and easy to make.

Flourless Peanut Butter Cookies
Source: Everyday Food
1 cup smooth peanut butter, I use fresh ground extra crunchy
3/4 cup brown sugar
1 large egg
1/2 tsp vanilla extract (optional) a must for me, I use at least a teaspoon
1/2 tsp baking soda
1/4 tsp salt
1 cup chocolate chips
Optional: To mix it up, I like to add a 1/3 cup chocolate, 1/3 cup peanut butter and 1/3 cup white chocolate chips. I also like to add some dry roasted peanuts for an extra peanut crunch.
Preheat oven to 350F. Line a baking sheet with parchment paper.
In a large bowl, beat together all ingredients until smooth, adding chocolate chips at the end of mixing.
Drop by tablespoonfuls onto prepared baking sheet and flatten slightly with a moistened finger.
Bake for about 10-13 minutes, until golden brown at the edges.
Cool on pan before removing to wire rack to cool completely.
Makes 2 dozen


Here is a link to another favorite peanut butter cookie, Triple Peanut Cookies. Peanut butter looses a lot of it's flavor when it is baked, so if you are looking for a peanut butter cookie that has a lot of peanut butter flavor, you should give this recipe a try. http://www.recipezaar.com/Triple-Peanut-Cookies-96609


This is a great recipe time when you want something healthier. This is my adaptation of a recipe originally from iVillage.com.

Peanut Butter Banana Cookies
1 egg
1/2 cup crunch peanut butter
1/2 cup banana, very ripe and mashed
1/4 cup whole wheat flour
1 teaspoon vanilla
1/4 cup wheat germ
3/4 cup white whole wheat flour
1/4 cup brown sugar
1 tablespoon Splenda brown sugar blend
1/2 teaspoon baking powder
1/2 teaspoon baking soda
Preheat oven to 350 degrees. Line a baking sheet with parchment paper.
In a large mixing bowl, combine egg, vanilla, sugars, peanut butter and banana. Beat on medium speed until combined and smooth.
Add all dry ingredients and mix until completely blended.
Drop by tablespoons onto baking sheet and bake until lightly brown, between 11 to 13 minutes.
Cool on a wire rack.

Peanut Butter Swirl Banana Bread an amazing recipe for banana bread lovers, and/or peanut butter lovers. It is very easy to make and everyone that tried it, loved it. It also comes from one of my favorite blogs, Baking Bites. She has so many great recipes, product reviews and much more. It's a must see. Check out her blog while you are there. http://bakingbites.com/2009/01/peanut-butter-swirl-banana-bread/


These muffins make a great breakfast treat or work as a healthier alternative to cupcakes at a kid's party. Our favorite muffin. 

Peanut Butter Banana Muffins
Source: About.com
1 cup flour, I use white whole wheat flour
1/4 cup sugar
1 teaspoon baking powder
1 teaspoon baking soda
1/8 teaspoon salt
1 egg
1 ripe banana, mashed
1/2 cup creamy peanut butter
1 cup buttermilk
2 tablespoons melted butter
Mix buttermilk, egg, banana, peanut butter and butter. Blend until smooth.
Mix dry ingredients together and add to wet mixture. Mix until well blended.
Pour batter into 12 buttered muffin tins.
Bake at 350 degrees for 25 minutes or until toothpick inserted comes out clean.


One more recipe, Cold Sesame Noodles. I have tried several recipes, trying to find a really good one. I stopped looking when I found this recipe. This recipe is better than take out! It makes a great side salad or can can be used as a main dish. I have been asked for this recipe many times. I am often asked to make it, which I love to do. I think this recipe is even better the next day, so it is a great dish to make the day before you need it. I often make a double recipe of the sauce, especially when I add strips of cooked chicken breast, to serve as a favorite summertime entree. I make sure all of the chicken is coated with the sauce before adding to the salad. Here you go, enjoy! http://www.recipezaar.com/Cold-Sesame-Noodles-122757


Sunday, February 28, 2010

Weekend Distractions

Yeah!! I'm so glad that the latest storm has passed through and the sun is shining again. Temps are expected to be in the 70's this week. We had quite a lot of rain and had some flooding in our area.

  
I know someone that wasn't bothered by the rain
 
 In fact, he was very happy it rained
 
He could play outside again
 
Ok, the fun is over, right? Wrong, he is actually laughing and screaming with such delight that he can hardly contain himself!

I have not heard what has happened in the burn areas since yesterday morning. The news reported that several people who lived in an area where they were expecting the worst, were trapped in their homes (because they ignored the evacuation orders). But, emergency teams said that due to the dangerous conditions, they were not going to intervene (see yesterday's post). I hope the residents in the mudslide areas are safe. After hearing about the latest earthquakes in Chile and Argentina, I have been on "bad news" overload and will wait to hear about what's going on in the world tomorrow. We were happy to hear that several friends in Chile were safe.

Saturday evening, we met my sister Lori and her husband Jeff at The Montage in Laguna Beach. As we headed south, the storm was clearing and we were able to enjoy the beautiful blue sky, puffy clouds and sunlight. 

 
Highway 73 - Toll Road
  
Ditto
  
One more
 
Laguna Canyon Road
 
Approaching PCH
 Entering the Montage
 
I know these pics are bad, we were moving! But hey, they're free!!

It is a beautiful resort. Check it out at http://www.montagelagunabeach.com/  We had a great time hanging out and catching up as we enjoyed a fabulous dinner at The Loft. Our table was outside on the balcony overlooking the ocean. It was a beautiful evening with great family/friends, exceptional food, and the sound of the ocean crashing on the rocks below. From the fromage at the beginning, to the mini ice cream sandwiches at the end, our meal was delightful! Today, I'm wishing I had pictures to post of everything we saw and ate last night so that I could share it with you. Sadly for you, I enjoyed being "in the moment" rather than looking at that moment pass by through the camera lens. Quite honestly, it didn't cross my mind, even though I had my camera in my handbag and had good intentions. Bye Lori and Jeff, Doug and Gail, we had the best time with you! Come back soon! And to the rest of you out there, if you have the chance, you need to go to The Loft at Montage. Add it to your destination wish list and take your camera. You can take your own pictures.

This morning I decided to make some scones. I will confess, I love scones. Not just any scone, it has to be the perfect scone, because I am very particular about scones. If I am going to enjoy those extra calories, I want it to be just right. It has to be crunchy on the outside and soft on the inside. It can't be white, it must be made with a whole grain flour, and it can't be covered in a thick layer of frosting. If it is a coffee shop scone, I can tell just by looking at it if it passes the test. 

If you are a scone lover too, you should check out this recipe. It went together very quickly. It uses whole wheat flour, oats, a banana. Rather than butter, it uses peanut butter as the fat. I found the recipe here: http://www.aminglingoftastes.com/2010/02/peanut-butter-chocolate-chip-scones.html.

I changed a couple of things. I used crunchy peanut butter and regular sized chocolate chips. I added a teaspoon of Vanilla. My only ripe banana was quite small, so we didn't taste any banana flavor. I will definitely use a medium/large banana next time. Due to the smaller size, I baked them for 13 minutes at 400 degrees. It made 24 instead of 8-10. I thought they turned out great.

As you can see, they don't look like the typical triangle shaped scones.
 

I cut mine into small squares. That way you can have two instead of one and you get lots of crunch in every bite. 


Now the rest go in a freezer bag and into the freezer. They crisp up after they defrost in a toaster oven set at 400 degrees for about 4-5 minutes, or until the outside has turned crispy rather than soft. Enjoy!