Saturday, July 10, 2010

Blog Surfing

Tablespoon has ideas for No-Cook Dinners for Hot Days which include salads, sandwiches and things for the grill that include lasagna! If your garden is full of swiss chard here are a few recipes that you might enjoy!

I found this great site that cover's a wide range of interests; mom's, kids, recipes, home and garden, plus more! Check out CafeMom.

These homemade fresh fruit popsicles are so easy they don't need a recipe. You can find the info here on Dandysugar. There are also a couple of links for some  popsicle recipes.

When Judy says "Best Blueberry Muffins" you listen! From Judy's Kitchen.

This Summer Pesto looks really good! You can check it out here on From Captain's Daughter to Army Wife.

Home Cooking has a recipe for a stone fruit tea cake with blueberries that is very colorful and makes a beautiful presentation. You can check it out here.

One Perfect Bite has a beautiful Courgette and Noodle Salad with Poppy Seed Dressing that is worth checking out. Courgette is a zucchini.

Too hot for soup? Try out this cool tomato soup from Taste of Home. This Gourmet Garden Tomato Salad looks really good too.

If you are a fan of RecipeZaar I'm posting a link that shows their new format. They are a great source for recipes. If you are interested, you can check it out here.

If it's not too hot to bake cookies where you live, you might want to take a look at The Oatmeal Cookie Blog. This blogger is working on 365 cookie recipes, one for every day of the year. He has other unique cookie recipes besides oatmeal.

Friday, July 9, 2010

An Afternoon at Rancho Los Alamitos

Southern California has several Ranchos, which are historic ranch sites that have been preserved and are now open to the public. We have enjoyed visiting Rancho Los Alamitos several times, and we recently spent another afternoon there. The ranch house is open for tours, but with one and two year-olds, we chose taking a walk through the beautiful gardens.


 The Cactus Garden


 The Bamboo Garden

There was a slight ocean breeze that afternoon and we couldn't believe the loud noise the bamboo makes as they sway in the breeze and hit each other. Don't plant this outside your bedroom window!


Wiley took this picture of us. Not too bad! I didn't realize it at the time, but when I downloaded the pictures, the pictures I took of the flowering garden weren't! Wiley had fun turning the dials on the camera and this Gramma forgot to change them back before taking more pictures. Oh, well, he had lots of fun taking pictures and changing all of the settings.


I will stop with this one!

Thursday, July 8, 2010

Homemade Butter

The first and last time I remember making butter was in Mrs. Hulse's second grade class. We sat around the room in a circle and passed a clear jar filled with cream and everyone had a chance to shake it for about 2 minutes. After the butter was ready, the mom helpers spread it on soda crackers and passed them out to use so we could all try it. I distinctly remember that I did not like it!  

I have noticed in the past year or so that some brands of butter aren't quite what it used to be. If I melt a little butter in a pan, there is a distinct water ring around the actual butter with several brands of butter. Tillamook, Danish and Kerry Gold are the exceptions that I have found. I don't feel like I am paying for water weight when I buy these brands.

I recently saw an episode of Alex's Day Off on the Food Network where she made homemade butter in minutes to have for a brunch that was being prepared. It looked so easy I decided that I had to make it. I especially wanted to see if homemade butter left a ring of water when melted!

The ingredients are very easy; 2-1/2 cups Heavy Cream and 1 cup Sour Cream (with out thickeners like Guar Gum.) I mixed them in my KitchenAide with the wire whip until blended and then turned it on medium high and set the timer for 5 minutes and this is what it looked like:


I remember my mom telling me, "Don't beat the cream too long or it will turn to butter" when I was young. There was always that fear of beating it too much.

This is what it looked like after another five minutes:


It was definitely thick and clumpy but it wasn't separating yet. I set the timer for three more minutes and then I had this:


This is what the recipe said would happen; buttermilk in the center with butter around the edges.
 
Next, I draped a double layer of cheesecloth over a large bowl: and then poured the mixture into the cheesecloth.


I then poured the mixture into the cheesecloth:


Next, I gathered it up and twisted the top as tight as possible so that the liquid would come out into the bowl. It took a while, but I finally got most of it out.


I then plunged it into a bowl of ice water so that it would solidify.


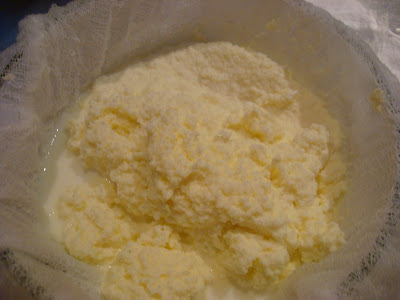
I pealed the cheesecloth off and wow, just like that! A perfect ball of butter! That was really easy!


This is what was left over, fresh buttermilk:


Believe me, this was the freshest butter we have ever tasted! And my suspicion was right, when we melted a little of it in a pan, there was not a ring of water around the butter! It would appear that some of the butter manufacturers are adding extra water to get the weight up and are giving the consumer an inferior product.

It was really easy, fun and well worth the effort. You should try it!

Wednesday, July 7, 2010

Ice Cream Cone Cupcakes

On the 4th, we had another birthday celebration for Wiley, and this time for his dad, too. When I asked Wiley what color of birthday cake he wanted, he said without any hesitation, "Pink." His mom told me later that he spent a week going through a "pink" phase, asking for everything pink! Why not, it's a great color! Definitely one of my favorites!

I bought a Wilton Ice Cream Cone Cake Pan a while back that I have been looking for an opportunity to use, so I decided that this was the perfect opportunity!


Now a view outside the box:


I'm not usually a cake mix user, but I'm not opposed to them if the situation and schedule need it, so I decided it would be easier and less time consuming to buy a pink cake mix rather than make one from scratch. I chose a Pillsbury strawberry cake mix. I though that the ice cream cone cakes would be even cuter with two separate flavors/colors, so I bought a Pillsbury devil's food cake mix too.
 

According to the box, each mix would make 24 regular cupcakes and between the two mixes, it made 12 cone bottoms and 12 ice cream tops. The cake pan made three trips into the oven to bake all of these:


The first step after baking and cooling is to cut the excess cake off to make them level so that they don't tip over! 


The last batch was a little short on batter so I ended up with two "baby" cones which worked out better for the two boys. I thought the swirls on the cone top were really cute and I hated to cover them up with frosting.


I tried to make the swirls with the frosting, which also came out of a can.


I was happy with how they turned out. Next time I will be more liberal with the sprinkles. My thought in the beginning was that they looked cute with the sprinkles right on the tip top. As I progressed, I started adding more because after all, aren't cupcakes all about the sprinkles? Especially for kids? By the time I came to this conclusion, and went back to add more, the frosting had already set up and the sprinkles just rolled right off! Oh well, I still thought they were cute!

  It was a two-napkin treat, but everyone enjoyed eating them in spite of their messiness!


Especially this little guy!

Tuesday, July 6, 2010

Fresh Ground Burgers or How to Make a Simple BBQ as Time Consuming and Difficult as Possible!

Have you every noticed that everyone is more hungry than usual after they have been swimming or even playing in the pool for an hour or more? And, they are also more tired than usual, and maybe even a little cranky? I have! At our recent pool party, I wanted to make sure that no one got too hungry or too tired, so we planned the party accordingly!

When the Gramma's were planning our family Birthday/4th/BBQ, we decided to make everything very simple and as easy for everyone involved as possible. Our contribution to the pool party, besides the pool, were the burgers and their condiments. In my opinion, when you need 14 burgers for a group of hungry people, the thing to do is go to Costco and buy a bag of their already formed and frozen burger patties. But, oh no! Not at our house! That would be too easy and my dear hubby will never settle for "too easy." No, he went to the store, twice, bought this meat...

Five pounds of tri-tip loin

He cut it into strips

He put the Food Grinder on the KitchenAid mixer...
(we already had this because he loves to grind fresh meat)


...and then the grinding began. This process is not for the faint of heart! I was standing about five feet away and I was splattered with what I will call "juices" from the meat! A small hunk also landed on my upper arm! And that's not saying anything about the clean kitchen floors, counters and cupboards!

And that was only for the first "coarse" grind!

He then put it through for the "fine hamburger" grind!

Ready to chill thoroughly in the refrigerator for a couple hours!
      
He divided the meat in two parts; 3 pounds for Blue Ribbon Burgers and 2 pounds for Best Burger's Ever! This is where I got involved; I provided the recipes! I found these recipes for Blue Ribbon Burgers and Best Burgers Ever years ago at Recipezaar. We have made both of these recipes for BBQ's before and they were excellent! Both of these burgers have a flavorful mixture that is placed in the center of each burger that gives them a real flavor enhancement.


This is a picture of the blue cheese center that was mixed together, formed into logs and then put in the refrigerator to firm up. It was then taken out of the refrigerator and cut into slices and placed between two pieces of meat and sealed together. The burger on the top left is a completed burger and the meat on the right is the top for the bottom burger (did I confuse you yet?) The Best Burgers ever had a spicy butter round that was placed between the two patties just like the photo above. The burgers were really good and everyone enjoyed them.


I guess my point of this story is; why go to Costco for a bag of convenient pre-formed frozen burger patties that can be put on the grill frozen with very little work involved, when you can spend hours going through all of the steps I have detailed here, not including all the time spent mopping and cleaning up, instead? 
In his defense, he was a cook in the Army 20+ years ago and he still enjoys cooking and doing these types of projects. He's great for big productions because he still thinks in "big and large quantities" when it comes to preparing food! And the best part is that he cleans up really well after himself and me! And they were a lot better than any burger you could ever buy a Costco!

 They were very, very good!