Don't forget to "Fall Back" to standard time on Sunday. Enjoy your extra hour of sleep!
Love and Homemade has several posts to help us get ready for Thanksgiving. She goes right to the experts to get her information and you can check it out here.
From Tasty Kitchen there are several interesting recipes this week: The easiest dinner roll you will ever make, Brown Sugar Glazed Carrots, Oreo Cheesecake Cookies, Autumn Mac and Cheese, Crock Pot Pulled Pork and Coleslaw Sandwiches, Cashew Chicken in Lettuce Cups.
Your Home Based Mom has a recipe for Artichoke and Spinach Dip and another recipe for Roasted Garlic and Artichoke Dip. At her other blog Portland Mama she is featuring a recipe for Caramel Apple Bundt Cake.
Wives with Knives has a recipe for her amazing looking Beef Barley Soup. If you see her picture of this soup, you will want to make it today.
Une-deux senses has a recipe for Spiced Pumpkin Baked Oatmeal that looks fantastic.
Two Peas and their Pod have a recipe for Cranberry Orange Cinnamon Rolls that look very good. They also have a recipe for Black Bean and Sweet Potato Tostadas that look interesting.
Pinch My Salt has a one layer Apple Cinnamon Buttermilk Cake that looks easy and good.
This Bacon and Egg Breakfast Pizza would make a great breakfast/brunch presentation and it looks really good. From Cheeky Kitchen.
Taste of Home is featuring a couple of healthy recipe this week: Roasted Garlic and Sweet Potato Soup and Makeover Baked Potato Soup. Here are a few more for Alfredo Chicken-n-Biscuits, Sweet Potato Fries, and Baked Eggs with Cheddar and Bacon.
This article entitled Raising an Adventurous Eater is worth passing on. It is about reclaiming the family dinner table and "creating and little peace and quiet for yourself." Great thoughts for young families from Relish.
Kitchen Daily featured a chili recipe from Marcus Samuelsson that they claim will be the only chili recipe you will ever use. When you see the ingredients you will know why. You can find the recipe here.
Here is a recipe for Flourless Chocolate Cake for those that can not eat gluten but it is also good for everyone else too. In place of flour it uses garbanzo beans. From Recipe Shoebox.
Saturday, November 6, 2010
Friday, November 5, 2010
Mini Caramel Apple Pies
 |
| Mini Caramel Apple Pies |
I started with a roll of Pillsbury's pie crust that is in the refrigerator section of most stores. I let it sit on the counter until it was room temperature, about 15 minutes, which makes it easier to work with. I used a glass that was 2-1/2 inches wide to cut out 12 little circles and I tucked them into a 12 cup non-stick mini muffin pan.
I took out about a cup of the fresh chunky applesauce I was making for dinner (on the previous post) and added a couple shakes of cinnamon and about 1/2 teaspoon of vanilla and mixed them in. Using a small teaspoon, I filled the pie crusts until they were filled just below the rim. I put 3 of the mini caramel bits on top of each one and pressed them down into the apple filling.
Next, I mixed 2 tablespoons of butter, cut into tiny pieces, 2 tablespoons of brown sugar and 3 tablespoons of flour and mixed them together. With my clean fingers, I mixed these together until they were crumbly. With my fingers, I placed this crumble topping on top of each little pie. At this point, I put them into the refrigerator until I was ready to bake them.
I baked them at 425 degrees for about 15 minutes. I let them cool for about 30 minutes and they popped right out. I put them on a plate and they were ready to serve. I grabbed my camera and took a few pictures before serving them. Everyone was very happy to see such small little bites! They were really good and so easy.
A little later, I downloaded my pictures and this is what I had:
 |
| Very blurry mini caramel apple pies |
 |
| Three little leftover pies |
Enjoy!
Thursday, November 4, 2010
Boneless Pork Ribs and Sauerkraut
This is one of my favorite meals to make in the fall and winter months. I didn't grow up eating sauerkraut and I was convinced that I didn't like it because of the smell. My Dear Hubby grew up eating sauerkraut and he would eat sauerkraut anytime it was available, which was always someplace other than our home.
When I saw this recipe I knew that Dear Hubby would love this meal. I can't even imagine what came over me when I decided to make this the first time. Although, I do remember thinking that I would scrape the sauerkraut off of mine. I was pleasantly surprised how good this dish smelled as it was cooking, and when I tasted it I loved it and even ate the sauerkraut. Now it is one of my favorites. Of course, Dear Hubby loved it too and I have made it many times since then.
This is a one pot meal and it can be cooked in the oven or on the stove top. I found the original recipe here on Recipezaar, which is now Food.com. I now double the sauerkraut in my version.
This recipe works well with a dutch oven, or any roasting type pan with a lid. You start by browning your floured and seasoned meat in hot oil in the pan. When browned, you transfer the meat to a plate, and add your sliced onion and minced garlic to the pan and saute until translucent. Next, you add the sauerkraut, crushed pineapple, caraway seed and bay leaves and mix it together. Then you place the meat back into the pan and carefully stir it up until it is well mixed. Now you are ready to put the lid on your pan and let it simmer on the stove top or cook in your oven for about 3 hours. That is it. Be prepared to have your neighbors drop by to see what you are fixing for dinner. The aroma will draw them in!
For variety, sometimes I add a couple of sliced apples when I add the sauerkraut. This time I made fresh chunky applesauce and served it along with boiled fingerling potatoes and frozen corn from the garden.
Slice the apples and put them in a sauce pan with a tablespoon or two of water or apple juice. Cover and simmer, stirring occasionally. It takes about 15 minutes for the apples to get tender. For chunky applesauce, don't smash the apples when you are stirring. For a smoother applesauce, smash with a fork or a hand masher. I used a combination of Yellow Delicious, Braeburn and Gala apples. They don't need any sugar, but you can add sugar if you prefer it sweetener. A little cinnamon is always good too. Serve either warm or chilled.
We had company for dinner and everyone enjoyed the meal. It wasn't fancy food but just good home cooking. Typically I would fix this on a cooler fall day, but it just happened to be a warm 73 degree day. I'm loving this Indian Summer! They say the weather will be changing next week here in the Pacific Northwest, so I'm trying to enjoy every minute.
Here is the printable recipe:
Enjoy!
When I saw this recipe I knew that Dear Hubby would love this meal. I can't even imagine what came over me when I decided to make this the first time. Although, I do remember thinking that I would scrape the sauerkraut off of mine. I was pleasantly surprised how good this dish smelled as it was cooking, and when I tasted it I loved it and even ate the sauerkraut. Now it is one of my favorites. Of course, Dear Hubby loved it too and I have made it many times since then.
This is a one pot meal and it can be cooked in the oven or on the stove top. I found the original recipe here on Recipezaar, which is now Food.com. I now double the sauerkraut in my version.
This recipe works well with a dutch oven, or any roasting type pan with a lid. You start by browning your floured and seasoned meat in hot oil in the pan. When browned, you transfer the meat to a plate, and add your sliced onion and minced garlic to the pan and saute until translucent. Next, you add the sauerkraut, crushed pineapple, caraway seed and bay leaves and mix it together. Then you place the meat back into the pan and carefully stir it up until it is well mixed. Now you are ready to put the lid on your pan and let it simmer on the stove top or cook in your oven for about 3 hours. That is it. Be prepared to have your neighbors drop by to see what you are fixing for dinner. The aroma will draw them in!
 |
| Ready for the table |
 |
| Chunky applesauce |
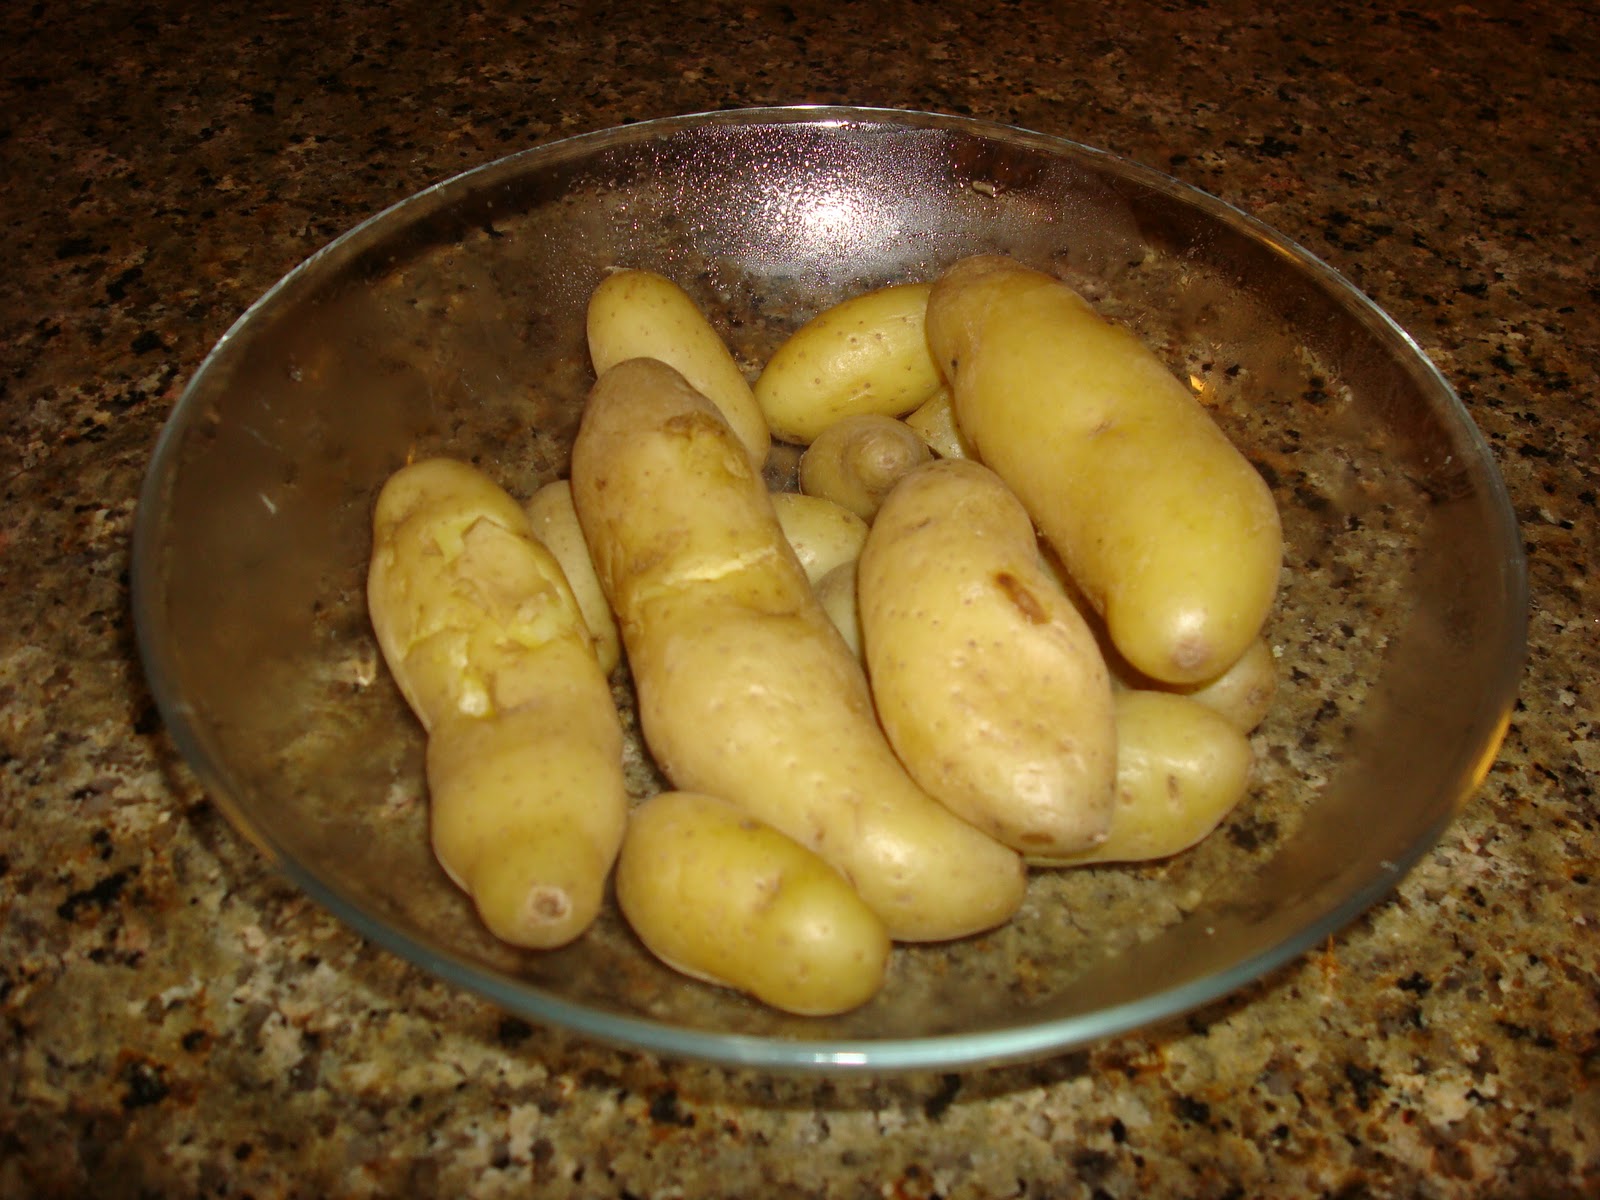 |
| Boiled fingerling potatoes |
 |
| For dessert, I served these Mini Caramel Apple Pies |
Here is the printable recipe:
Enjoy!
Wednesday, November 3, 2010
.jpg)
.jpg)
Tuesday, November 2, 2010
Chicken and Noodles
My Grandma Letha made the best chicken and noodles in the world! Our world anyway! Most families have that special thing that their grandma or aunt or mom made for special occasions, and in our family it was Grandma Letha's chicken and noodles and Auntie Barb's galuskies. In our immediate family, it was our mom's potato salad and chocolate cream pie.
The thing that made Grandma Letha's chicken and noodles so special, was her noodles. She rolled the dough out until it was paper thin and she cut the noodles thin, thin, super thin! In my early married years, I often tried to make them like hers but I would always end up with big thick noodles that you had to chew. I don't think we had to chew Grandma Letha's noodles. Her noodles slid down like butta.'
After our Perfect Roast Chicken dinner, we had carrots, fennel, onion, chicken and broth leftover, so I decided to make chicken and noodles for dinner the next night. First I took all of the leftover veggies and chopped them into smaller pieces. Then I pulled all of the chicken off of the carcass and broke the carcass it into four pieces. I put the pieces, small bones, skin and all into some lightly salted boiling water, covered it and let it simmer for about 30 minutes. I then poured the liquid through a sieve and discarded all of the skin and bones. I then put the broth into the refrigerator to cool and then skimmed the fat off of the top. I then added this broth to the other leftover broth and placed it in the refrigerator.
The next step was making the homemade noodles. I mixed together 2 cups flour, 1/4 teaspoon Salt and 1/4 teaspoon baking soda. I made a well in the middle of the flour for the eggs.
I added the water 1/4 cup at a time, tossing lightly until all of the water was incorporated. I added most of the second 1/4 cup of water and tossed until I could tell that it was moist enough to form a ball with my hands. Too much water and too much stirring will make the noodles tough. I gathered the dough into a ball and kneaded a few times, just until it all came together. I divided the dough into quarters and let them sit for a couple of minutes.
The process of making noodles is not hard but it does take time. Allow about an hour to get them rolled out and sliced. Once you are at the drying stage you are almost there. The noodles should dry for a couple of hours, and should be tossed around so that they can dry evenly.
If your preference is larger noodles, that works just fine. Don't roll them out too thin and slice them thicker. They do take a little longer to dry the thicker they are but that's not a problem, just start them earlier so they have more time to dry. In my experience if I want more noodles, I make them one batch at a time for a more consistent outcome. If you have a pasta maker or a pasta attachment for your mixer that works well too, and is much faster. I sold my pasta maker some time ago. I prefer to make them this way.
The next step was taking the broth out of the refrigerator and skimming any remaining fat off the top. I had about 7-8 cups of broth. I then placed the broth into a a medium sized dutch oven and brought the broth to a low boil and added the noodles. It only takes minutes to cook your noodles, especially when they are thin. I cooked them until they were fork tender and the broth was starting to thicken. I added the cut up vegetables and the chicken that had been torn into bite sized pieces and turned the heat down to simmer. I covered the pot and left it alone for about 10 minutes. The broth continued to thicken and everything had warmed thoroughly. At this point, you have to make a judgment call on how thick you want your chicken and noodles to be. If you want yours a little thicker, mix a little flour with water, mix it up so there aren't any lumps, and add it to the pan, stirring well to incorporate, and bring up to a low boil for a couple of minutes so you don't have a floury texture or taste. If you like yours less thick, add a little more broth or water.
I was happy with how they turned out and we enjoyed them very much. I don't remember carrots in Grandma's chicken and noodles, but I wanted to use them and it certainly didn't hurt them at all. I think Grandma Letha would have been proud of my attempt. I know that my cousins make them too and have their own versions that I know are very good. We have a lot of good cooks in the family. I know Grandma Letha would be happy to see the legacy she has left to her kids, grandkids, great-grandkids and great, great grandkids. Now, if only I had her recipe for the cinnamon rolls she made on Saturday morning...
Enjoy!
The thing that made Grandma Letha's chicken and noodles so special, was her noodles. She rolled the dough out until it was paper thin and she cut the noodles thin, thin, super thin! In my early married years, I often tried to make them like hers but I would always end up with big thick noodles that you had to chew. I don't think we had to chew Grandma Letha's noodles. Her noodles slid down like butta.'
After our Perfect Roast Chicken dinner, we had carrots, fennel, onion, chicken and broth leftover, so I decided to make chicken and noodles for dinner the next night. First I took all of the leftover veggies and chopped them into smaller pieces. Then I pulled all of the chicken off of the carcass and broke the carcass it into four pieces. I put the pieces, small bones, skin and all into some lightly salted boiling water, covered it and let it simmer for about 30 minutes. I then poured the liquid through a sieve and discarded all of the skin and bones. I then put the broth into the refrigerator to cool and then skimmed the fat off of the top. I then added this broth to the other leftover broth and placed it in the refrigerator.
The next step was making the homemade noodles. I mixed together 2 cups flour, 1/4 teaspoon Salt and 1/4 teaspoon baking soda. I made a well in the middle of the flour for the eggs.
 |
| I mixed together 3 egg yolks and poured them into the well I had created. My eggs were jumbo. If they were large eggs I would use 4 egg yolks. |
 |
| I stirred in the egg yolks until they were incorporated into the flour. It looked similar to a what pie crust looks like before adding the liquid. |
 |
| I placed a fork next to this ball of dough so you could better see what size they were |
 |
| I lightly floured the dough and rolled it out until it was as thin as I could get it, and then I rolled it out some more |
 |
| I floured the dough a little more and then lightly rolled it up cinnamon roll style and then I started slicing the dough into noodles, as thin as I could get them. |
 |
| They should look something like this |
 |
| Now you want to lay them out on a dry cloth to dry out. |
If your preference is larger noodles, that works just fine. Don't roll them out too thin and slice them thicker. They do take a little longer to dry the thicker they are but that's not a problem, just start them earlier so they have more time to dry. In my experience if I want more noodles, I make them one batch at a time for a more consistent outcome. If you have a pasta maker or a pasta attachment for your mixer that works well too, and is much faster. I sold my pasta maker some time ago. I prefer to make them this way.
The next step was taking the broth out of the refrigerator and skimming any remaining fat off the top. I had about 7-8 cups of broth. I then placed the broth into a a medium sized dutch oven and brought the broth to a low boil and added the noodles. It only takes minutes to cook your noodles, especially when they are thin. I cooked them until they were fork tender and the broth was starting to thicken. I added the cut up vegetables and the chicken that had been torn into bite sized pieces and turned the heat down to simmer. I covered the pot and left it alone for about 10 minutes. The broth continued to thicken and everything had warmed thoroughly. At this point, you have to make a judgment call on how thick you want your chicken and noodles to be. If you want yours a little thicker, mix a little flour with water, mix it up so there aren't any lumps, and add it to the pan, stirring well to incorporate, and bring up to a low boil for a couple of minutes so you don't have a floury texture or taste. If you like yours less thick, add a little more broth or water.
 | |
| A bowl of Chicken and Noodles |
Enjoy!
Monday, November 1, 2010
Foggy Mornings, Cloud Filled Days
Oh foggy mornings, how I have missed you! There is nothing quite as beautiful as clinging stretches of fog, hugging the trees and ground in the morning.


Beautiful cloud filled days, I have missed you too!! So happy to see you again!


Subscribe to:
Posts (Atom)